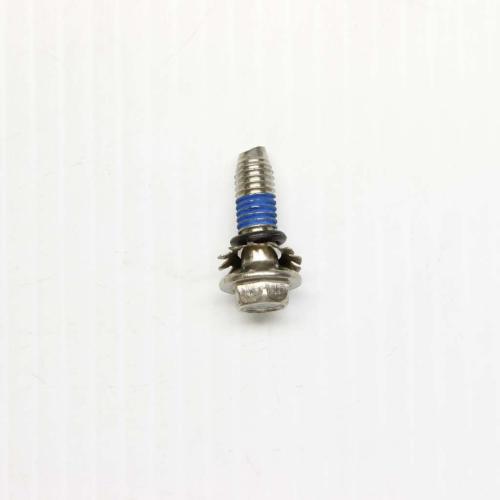
Laundry Centre Screw

Laundry Centre Screw Parts

Laundry centre screws may be small, but they keep important parts secure. They hold panels, brackets, hinges, control consoles, grounding wires, motor mounts, hose retainers, and access covers in place. If a screw is missing, stripped, rusted, or replaced with the wrong size, the unit may rattle, vibrate, loosen, or become unsafe to service.

The right screw depends on where it is used and which model you own. A cabinet screw is not always the same as a door hinge screw. A grounding screw is not the same as a panel screw. A terminal screw must match the electrical connection it secures. For a wider view of parts that may sit around the same repair area, start with laundry center parts and then narrow your search by exact screw location.

So, what type of screw has a built-in washer? It is often called a washer-head screw or a screw with an integrated washer head. These are common in appliance panels because the wider head spreads pressure and helps hold thin metal or plastic without pulling through. If your laundry center originally used a washer-head screw, replacing it with a small standard screw may not hold the panel correctly.

Where Laundry Centre Screws Are Commonly Used

Laundry centers combine washer and dryer sections in one cabinet, so screws appear in many places. Some are visible on the rear panel. Some are hidden behind the control console or inside the door opening. Others hold brackets, switches, trim, hinges, hose guides, and access panels. If you remove multiple screws during a repair, place them in labeled groups because similar screws may have different lengths or thread types.

Screw location

What it secures

Why correct fit matters

Cabinet or access panel

Front, rear, top, or lower service panels

Prevents vibration and keeps panels aligned

Control console

Timer, selector area, display housing, or switch bracket

Keeps controls stable and protects wiring

Door or lid hinge

Washer lid, dryer door, or hinge bracket

Prevents sagging, misalignment, and latch problems

Motor or bracket mount

Motor, pulley guard, or support bracket

Maintains safe alignment during operation

Grounding point

Electrical ground wire or terminal area

Supports safe electrical continuity

If you are replacing a switch, keep the original mounting screws if they are not damaged. A laundry centre switch may sit in a plastic bracket that can crack if a longer or wider screw is forced into it. If the old screw is stripped, replace it with the correct part rather than tightening harder. Over-tightening can damage the control panel or switch body.

How to Identify the Correct Screw

Start with the model number and screw location. Then compare the screw length, thread size, head type, point style, and finish. Some appliance screws are self-tapping for sheet metal. Others are machine screws designed for threaded inserts. Some have hex heads, Phillips heads, Torx heads, or washer heads. The wrong head type may not sit flush, and the wrong thread may strip the mount.

So, what size is a dryer terminal screw? The exact size depends on the dryer or laundry center model and the terminal block design. Because terminal screws secure electrical connections, do not guess. Use the appliance parts diagram or the model-specific replacement. A loose or incorrect terminal screw can create heat, arcing, or power issues. If a terminal block is burned or cracked, replace the damaged electrical part instead of only changing the screw.

If the screw holds a hose clamp, pipe bracket, or rear drain support, also inspect the nearby laundry centre pipe area. A missing hose-retainer screw can allow a drain hose to move during spin, and movement can lead to leaks or noisy operation. Hardware and hoses often work together, so replacing the correct screw can protect the pipe repair.

Symptoms Caused by Missing or Wrong Screws

A loose screw can sound like a serious mechanical failure. You may hear rattling during spin, buzzing during dryer operation, or panel vibration when the washer drains. If the unit was recently serviced and new noise appeared afterward, check that all screws were reinstalled in the correct locations. A missing panel screw may not stop the machine, but it can allow air leaks, vibration, and unsafe access to moving or electrical components.

So, how do you remove a washer off a screw? If the washer is built into the screw head, it is not meant to be removed. If it is a loose washer stuck under the screw head, remove the screw first, then lift the washer away with needle-nose pliers. If the screw is rusted or stripped, use the correct driver size, press firmly, and avoid rounding the head. Stop if the screw holds an electrical part and you are not sure how to safely disconnect power.

Problem

Likely screw issue

What to do before ordering

Panel rattles

Missing, loose, or wrong cabinet screw

Check panel holes and compare screw length

Door does not align

Loose hinge screw or stripped hinge mount

Inspect hinge, bracket, and latch alignment

Control knob area shifts

Console screw or switch screw missing

Check switch bracket and console frame

Drain hose moves

Hose guide screw or bracket screw missing

Inspect hose clip and rear panel mount

Electrical connection overheats

Terminal screw loose or incorrect

Unplug unit and inspect terminal block condition

Screw Types You May See in a Laundry Center

People often ask about the six types of screws. In appliance repair, you may see machine screws, sheet-metal screws, self-tapping screws, hex-head screws, Torx screws, and washer-head screws. You may also see grounding screws or set screws depending on the part. The name matters less than the fit. The replacement must match the original location, not just the general screw category.

If the screw supports a moving part, such as a drum bracket or belt guard, do not replace it with hardware that is too short or too soft. On some combo units, drum-related repairs may involve the washer-dryer combo drum or surrounding brackets, and the fasteners must hold up under vibration. A weak screw can loosen again quickly.

If the screw is part of a control repair, check the connected knob or switch before closing the panel. A damaged washer-dryer combo screw on a combo appliance may appear similar but may not match the laundry center. Use the right appliance family and model number to avoid thread mismatch.

Safe Replacement Tips

Unplug the laundry center before removing panels, console screws, grounding screws, or any hardware near wiring. Keep the appliance stable, especially if it is installed in a tight closet. Do not run the machine with access panels removed unless a service procedure specifically calls for it. Panels help direct airflow, protect wiring, and keep hands away from moving parts.

When installing a replacement screw, start it by hand so you can feel whether it is threading correctly. If it resists immediately, back it out and check alignment. Cross-threading can damage the mount. Tighten until secure, but do not over-tighten plastic brackets, switch mounts, or trim panels. If a hole is stripped, the correct repair may involve replacing the bracket or panel, not using a larger random screw.

Ordering Checklist

  • Find the full laundry center model number.
  • Identify the screw location before ordering.
  • Compare length, head type, thread style, and washer-head design.
  • Do not substitute terminal screws or grounding screws with random hardware.
  • Group removed screws by panel or part during repair.

The correct laundry centre screw keeps the repair stable and helps prevent vibration, leaks, loose controls, and unsafe electrical connections. Even small hardware should be matched carefully, especially on compact stacked appliances where panels, hoses, switches, and wiring sit close together.

Search result

Show filters
1 - 40 out of 12 results found in 0.003s
Sorted by

Laundry centre screws may be small, but they keep important parts secure. They hold panels, brackets, hinges, control consoles, grounding wires, motor mounts, hose retainers, and access covers in place. If a screw is missing, stripped, rusted, or replaced with the wrong size, the unit may rattle, vibrate, loosen, or become unsafe to service.

The right screw depends on where it is used and which model you own. A cabinet screw is not always the same as a door hinge screw. A grounding screw is not the same as a panel screw. A terminal screw must match the electrical connection it secures. For a wider view of parts that may sit around the same repair area, start with laundry center parts and then narrow your search by exact screw location.

So, what type of screw has a built-in washer? It is often called a washer-head screw or a screw with an integrated washer head. These are common in appliance panels because the wider head spreads pressure and helps hold thin metal or plastic without pulling through. If your laundry center originally used a washer-head screw, replacing it with a small standard screw may not hold the panel correctly.

Where Laundry Centre Screws Are Commonly Used

Laundry centers combine washer and dryer sections in one cabinet, so screws appear in many places. Some are visible on the rear panel. Some are hidden behind the control console or inside the door opening. Others hold brackets, switches, trim, hinges, hose guides, and access panels. If you remove multiple screws during a repair, place them in labeled groups because similar screws may have different lengths or thread types.

Screw location

What it secures

Why correct fit matters

Cabinet or access panel

Front, rear, top, or lower service panels

Prevents vibration and keeps panels aligned

Control console

Timer, selector area, display housing, or switch bracket

Keeps controls stable and protects wiring

Door or lid hinge

Washer lid, dryer door, or hinge bracket

Prevents sagging, misalignment, and latch problems

Motor or bracket mount

Motor, pulley guard, or support bracket

Maintains safe alignment during operation

Grounding point

Electrical ground wire or terminal area

Supports safe electrical continuity

If you are replacing a switch, keep the original mounting screws if they are not damaged. A laundry centre switch may sit in a plastic bracket that can crack if a longer or wider screw is forced into it. If the old screw is stripped, replace it with the correct part rather than tightening harder. Over-tightening can damage the control panel or switch body.

How to Identify the Correct Screw

Start with the model number and screw location. Then compare the screw length, thread size, head type, point style, and finish. Some appliance screws are self-tapping for sheet metal. Others are machine screws designed for threaded inserts. Some have hex heads, Phillips heads, Torx heads, or washer heads. The wrong head type may not sit flush, and the wrong thread may strip the mount.

So, what size is a dryer terminal screw? The exact size depends on the dryer or laundry center model and the terminal block design. Because terminal screws secure electrical connections, do not guess. Use the appliance parts diagram or the model-specific replacement. A loose or incorrect terminal screw can create heat, arcing, or power issues. If a terminal block is burned or cracked, replace the damaged electrical part instead of only changing the screw.

If the screw holds a hose clamp, pipe bracket, or rear drain support, also inspect the nearby laundry centre pipe area. A missing hose-retainer screw can allow a drain hose to move during spin, and movement can lead to leaks or noisy operation. Hardware and hoses often work together, so replacing the correct screw can protect the pipe repair.

Symptoms Caused by Missing or Wrong Screws

A loose screw can sound like a serious mechanical failure. You may hear rattling during spin, buzzing during dryer operation, or panel vibration when the washer drains. If the unit was recently serviced and new noise appeared afterward, check that all screws were reinstalled in the correct locations. A missing panel screw may not stop the machine, but it can allow air leaks, vibration, and unsafe access to moving or electrical components.

So, how do you remove a washer off a screw? If the washer is built into the screw head, it is not meant to be removed. If it is a loose washer stuck under the screw head, remove the screw first, then lift the washer away with needle-nose pliers. If the screw is rusted or stripped, use the correct driver size, press firmly, and avoid rounding the head. Stop if the screw holds an electrical part and you are not sure how to safely disconnect power.

Problem

Likely screw issue

What to do before ordering

Panel rattles

Missing, loose, or wrong cabinet screw

Check panel holes and compare screw length

Door does not align

Loose hinge screw or stripped hinge mount

Inspect hinge, bracket, and latch alignment

Control knob area shifts

Console screw or switch screw missing

Check switch bracket and console frame

Drain hose moves

Hose guide screw or bracket screw missing

Inspect hose clip and rear panel mount

Electrical connection overheats

Terminal screw loose or incorrect

Unplug unit and inspect terminal block condition

Screw Types You May See in a Laundry Center

People often ask about the six types of screws. In appliance repair, you may see machine screws, sheet-metal screws, self-tapping screws, hex-head screws, Torx screws, and washer-head screws. You may also see grounding screws or set screws depending on the part. The name matters less than the fit. The replacement must match the original location, not just the general screw category.

If the screw supports a moving part, such as a drum bracket or belt guard, do not replace it with hardware that is too short or too soft. On some combo units, drum-related repairs may involve the washer-dryer combo drum or surrounding brackets, and the fasteners must hold up under vibration. A weak screw can loosen again quickly.

If the screw is part of a control repair, check the connected knob or switch before closing the panel. A damaged washer-dryer combo screw on a combo appliance may appear similar but may not match the laundry center. Use the right appliance family and model number to avoid thread mismatch.

Safe Replacement Tips

Unplug the laundry center before removing panels, console screws, grounding screws, or any hardware near wiring. Keep the appliance stable, especially if it is installed in a tight closet. Do not run the machine with access panels removed unless a service procedure specifically calls for it. Panels help direct airflow, protect wiring, and keep hands away from moving parts.

When installing a replacement screw, start it by hand so you can feel whether it is threading correctly. If it resists immediately, back it out and check alignment. Cross-threading can damage the mount. Tighten until secure, but do not over-tighten plastic brackets, switch mounts, or trim panels. If a hole is stripped, the correct repair may involve replacing the bracket or panel, not using a larger random screw.

Ordering Checklist

  • Find the full laundry center model number.
  • Identify the screw location before ordering.
  • Compare length, head type, thread style, and washer-head design.
  • Do not substitute terminal screws or grounding screws with random hardware.
  • Group removed screws by panel or part during repair.

The correct laundry centre screw keeps the repair stable and helps prevent vibration, leaks, loose controls, and unsafe electrical connections. Even small hardware should be matched carefully, especially on compact stacked appliances where panels, hoses, switches, and wiring sit close together.

1321 products

Part

LG Screw, Customized FAB31741301
FAB31741301
$6.56 $7.74

In stock 15 Products

Quick View

In stock 15 Products

Part

LG

$6.56 $7.74
Quick View

Part

Whirlpool Washer and Dryer Screw W10772621
W10772621
$5.45 $12.45

In stock 102 Products

Quick View

In stock 102 Products

Part

Whirlpool

$5.45 $12.45
Quick View

Part

Whirlpool Screw W10752187
W10752187
$4.95 $11.95

In stock 862 Products

Quick View

In stock 862 Products

Part

Whirlpool

$4.95 $11.95
Quick View

Part

GE Washers and Dryer Washer Hub Nut WH02X10363
WH02X10363
$9.95 $16.95

In stock 61 Products

Quick View

In stock 61 Products

Part

GE

$9.95 $16.95
Quick View

Part

LG Shipping Bolt FAA31690701
FAA31690701
$27.45

In stock 2 Products

Quick View

In stock 2 Products

Part

LG

$27.45
Quick View

Part

Whirlpool Screw - WP358237
WP358237
$4.95 $11.95

In stock 278 Products

Quick View

In stock 278 Products

Part

Whirlpool

$4.95 $11.95
Quick View

Part

Whirlpool Part# W11404293 Lid Side Screw - Genuine OEM
W11404293
$9.95 $12.94

In stock 28 Products

Quick View

In stock 28 Products

NLA

Whirlpool

$9.95 $12.94
Quick View

Part

Samsung Blower Wheel Nut 6021-001201
6021-001201
$4.95 $6.44

In stock 70 Products

Quick View

In stock 70 Products

Part

Samsung

$4.95 $6.44
Quick View

Part

Samsung Motor Bolt DC97-02412A
DC97-02412A
$16.74 $23.74

In stock 216 Products

Quick View

In stock 216 Products

Part

Samsung

$16.74 $23.74
Quick View

Part

Samsung Washer Hex Bolt – DC60-40137A
DC60-40137A
$8.58 $10.34

In stock 63 Products

Quick View

In stock 63 Products

Part

Samsung

$8.58 $10.34
Quick View

Part

LG Part# FAA31690704 Bolt Assembly (OEM)
FAA31690704
$12.95 $16.84

In stock 0 Products

Quick View

In stock 0 Products

Part

LG

$12.95 $16.84
Quick View

Part

LG Frame Screw (Customized) FAB30598601
FAB30598601
$11.95 $15.54

In stock 0 Products

Quick View

In stock 0 Products

Part

LG

$11.95 $15.54
Quick View

Part

Whirlpool Spanner Nut – WP21366
WP21366
$5.95 $7.74

In stock 51 Products

Quick View

In stock 51 Products

Part

Whirlpool

$5.95 $7.74
Quick View

Part

Samsung Washing Machine Hexagon Nut 6021-001573
6021-001573
$53.06 $57.86

In stock 58 Products

Quick View

In stock 58 Products

Part

Samsung

$53.06 $57.86
Quick View

Part

Samsung Pulsator Bolt DC60-40133A
DC60-40133A
$9.18 $14.95

In stock 35 Products

Quick View

In stock 35 Products

Part

Samsung

$9.18 $14.95
Quick View

Part

LG Motor Rotor Bolt Kit 4040FR4051C
4040FR4051C
$17.55 $24.55

In stock 27 Products

Quick View

In stock 27 Products

Part

LG

$17.55 $24.55
Quick View

Part

Whirlpool Part# WP98234 Cabinet Clip (OEM)
WP98234
$5.95 $12.95

In stock 17 Products

Quick View

In stock 17 Products

Part

Whirlpool

$5.95 $12.95
Quick View

Part

WH02X29618
$14.17 $18.42

In stock 3 Products

Quick View

In stock 3 Products

Part

GE

$14.17 $18.42
Quick View

Part

GE Front Panel Screws WE02X26338
WE02X26338
$7.95 $10.34

In stock 0 Products

Quick View

In stock 0 Products

Part

GE

$7.95 $10.34
Quick View

Part

Whirlpool Part# WPW10283361 Drum Pulley Nut (OEM)
WPW10283361
$32.29 $41.98

In stock 0 Products

Quick View

In stock 0 Products

Part

Whirlpool

$32.29 $41.98
Quick View

Frequently Asked Questions

Quick answers for your replacement part needs

Where can I find genuine replacement parts for my appliance?

Finding genuine replacement parts for your appliances has never been easier! We offer authentic parts for over 250 brands, including LG, Samsung, Whirlpool, Kenmore, Dyson, Bosch, and Liebherr. Simply enter your appliance's model number on our website, and explore our extensive selection of compatible parts designed to restore your appliance's peak performance and reliability.

What type of appliance parts and accessories are available for purchase?

Are your replacement parts compatible with all models?

What if I can’t find the appliance part I need?

How can I track my order for appliance parts online?

How long will it take to receive my replacement parts order?

Can I return appliance parts if they are not compatible with my model?

How can I update my shipping address after placing an order?

How can I get in touch with customer support?

Couldn’t find the answer to your question?

Your satisfaction matters. Let us know how we can assist with your repair journey.

Your Cart ( 0 items)

You currently have 0 items in your Cart

Return to shop
Menu

Compatible Models