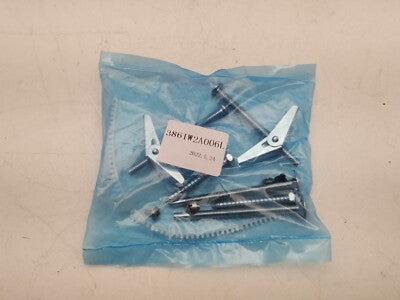
GE microwave hardware and fasteners include more than ordinary cabinet screws. The collection can contain top-mounting nuts, panel screws, clips, retainers, display holders, wire supports, spacers, bushings, and appliance-specific installation pieces. Each item controls a particular depth, clamping force, electrical clearance, ground path, or alignment. A screw that fits the hole can still be wrong if it projects into wiring, misses a grounding surface, deforms a waveguide cover, or prevents the outer case from seating.
Identify the missing hardware from its exact location and the parts diagram before opening the microwave. Over-the-range mounting hardware supports substantial weight and must match the installation instructions, cabinet construction, wall support, and mounting plate. Internal fasteners may sit near the control board, latch assembly, fan, transformer, capacitor, or cavity. Because a high-voltage capacitor can retain a dangerous charge after power is disconnected, internal hardware replacement belongs with trained service whenever protected electrical areas must be entered.
Do not solve a rattle by tightening every visible screw. First locate the moving joint with the microwave disconnected. A loose grille, bottom panel, control panel, outer case, duct, or mounting plate produces a different sound and needs different hardware. Check whether a tab or bracket is cracked, a hole is enlarged, or a spacer is missing. Over-tightening a correct fastener can strip a molded boss or distort thin sheet metal, while adding washers can change the designed clearances.
Quick inspection sequence
- Record the exact hardware location, the component it secures, and whether the concern is looseness, missing hardware, stripped threads, corrosion, or an incorrect previous repair.
- Disconnect power. Do not remove the outer case or enter protected high-voltage areas unless the assigned service procedure and trained personnel are available.
- Photograph the head style, washer stack, clip orientation, ground lead, spacer, surrounding tabs, and the depth available behind the mounting hole.
- Inspect both mating surfaces for cracks, enlarged holes, bent flanges, damaged threads, compressed foam, and evidence that a longer screw contacted wiring or a hidden part.
- For over-the-range installations, support the appliance and verify that wall-plate tabs, upper-cabinet points, anchors, and structural support remain secure before loosening mounting hardware.
- Collect loose hardware from the cooking cavity, fan path, and cabinet. Do not operate the microwave with a conductive object free to move inside the enclosure.
Match the correct GE microwave hardware and fastener part part
- Match the complete part number and hardware role, not just diameter. Compare thread pitch, thread-forming design, overall length, threaded length, and tip shape.
- Compare head style, drive type, captive washer, flange, shoulder, finish, material, heat exposure, and whether the part provides electrical continuity.
- For clips, retainers, and holders, match every tab, slot, spring angle, insertion direction, cable opening, stand-off height, and mating component.
- Confirm the quantity used at that exact location. Similar screws elsewhere on the cabinet may have different lengths because the clearance behind each hole changes.
- Replace damaged receiving hardware as well. A new screw cannot restore clamping force in a cracked boss, stripped nut, distorted bracket, or enlarged sheet-metal hole.
Common problems and repair checks
Why is an over-the-range GE microwave loose at the upper cabinet?
Stop using the appliance if it shifts, drops at one corner, or separates from the wall. Support its weight before checking the upper-cabinet bolts, top mounting nuts, cabinet reinforcement, wall plate, and rear engagement tabs. A loose upper fastener can be the visible symptom of a mounting plate that is not anchored to adequate structure. The GE microwave top mounting nut WB01X10071 should be matched by part number, thread, flange, and assigned bolt. Do not substitute a common nut or stack loose washers to bridge an oversized cabinet hole. Follow the installation instructions for cabinet reinforcement and mounting sequence, and use enough people to control the appliance. The repair is complete only when the microwave is fully engaged at the wall plate and evenly secured above.
Why does a GE microwave grille or panel rattle after service?
Disconnect power and locate the exact joint that moves. Check whether the grille or panel hooks are engaged before inspecting its screws, clips, and spacers. A fastener tightened against a missed tab can bow the panel while leaving the opposite corner loose. Compare the GE microwave hardware part WB01X10180 by part number, head, length, washer, finish, and installation position. Do not use a longer screw to obtain more grip because the tip may contact a duct, wire, or control component. If the receiving boss is cracked or the panel slot is enlarged, replace or repair that mating part rather than over-tightening. Reassemble the hooks first, tighten evenly, and confirm door and vent clearance before applying power.
Why will a GE microwave control or display assembly not stay seated?
A loose display can result from a missing holder, broken support tab, incorrect screw, shifted bracket, or ribbon cable trapped behind the assembly. Disconnect power and follow high-voltage service precautions before entering the control area. Photograph the board supports and grounds, then inspect each stand-off for cracking. The GE microwave display holder WB02X32855 must match the board outline, mounting points, display window, and surrounding panel. Do not let an electronic board hang by its harness while fitting the holder. Transfer only specified cushions, insulators, and clips, and use electrostatic-discharge precautions. After installation, verify that the display does not press against the panel and that no fastener or bracket can short board conductors.
Why does a replacement GE microwave screw stop before the panel is tight?
Remove it without forcing the threads. Compare the new and original screws side by side for pitch, diameter, shoulder, captive washer, tip, and threaded length. Paint, debris, cross-threading, a shifted captive nut, or a hidden spacer installed incorrectly can also stop a correct screw. Match the GE microwave hardware part WB01X10298 by complete part number and exact diagram location. Never drive a screw with extra torque into a microwave cavity flange or electrical enclosure. Doing so can strip the receiver, deform a sealing surface, or project into wiring. Correct the alignment, replace damaged receiving hardware, start threads by hand, and tighten only until the secured component sits flat without distortion.
Symptom and decision guide
|
Observed symptom
|
Check before ordering
|
Repair direction
|
|
Microwave shifts at cabinet
|
Upper hardware, reinforcement, wall plate, rear tabs
|
Support appliance and restore full mounting system
|
|
Panel rattles
|
Hooks, screw length, clip, boss, spacer
|
Repair the moving joint without over-tightening
|
|
Board or display moves
|
Holder, standoffs, bracket, ribbon clearance
|
Secure electronics with assigned supports
|
|
Screw binds early
|
Thread, pitch, alignment, debris, captive nut
|
Do not force; correct identity and receiver
|
Related GE part categories
If a correct screw cannot hold because the supporting piece is bent or cracked, inspect the GE microwave bracket collection. Hardware and bracket geometry must be restored together.
When a panel still flexes after its fasteners are correct, compare the GE microwave panel collection. Broken tabs and enlarged bosses cannot be corrected by a larger screw.
If a missing clip has allowed wiring to rub against sheet metal, review the GE microwave wire harness collection. Repair damaged insulation and restore every cable restraint.
Installation and safety
- Disconnect power. Support an over-the-range microwave before loosening mounting hardware, and use trained service for access near high-voltage components.
- Photograph the original stack and label location. Protect the cavity finish and keep every loose metal item out of ducts, fans, and electrical spaces.
- Engage tabs and align holes before starting hardware by hand. Restore grounds, spacers, clips, and captive washers without substituting size or material.
- Tighten evenly to secure the component without distortion. Confirm mounting stability, door clearance, panel fit, airflow, and absence of rattles.
Before-ordering checklist
|
Verify
|
What must match
|
|
Fastener identity
|
Part number, thread, diameter, length, shoulder, tip, head, drive, washer, finish, and material
|
|
Exact location
|
Upper cabinet, wall plate, grille, panel, holder, bracket, duct, harness, ground, or internal assembly
|
|
Receiving part
|
Nut, boss, clip, tab, bracket, hole, threads, reinforcement, and clearance behind the joint
|
|
Final condition
|
Full support, even clamping, preserved grounding, no pinched wires, no projection, and no loose metal
|